Starting an online store in 2025 doesn’t require technical expertise or business experience – we know because we’ve helped countless beginners build successful shops.
WordPress makes it easier than ever to create your first online store, even if you don’t have any experience with web design or eCommerce.
We use WordPress paired with Easy Digital Downloads to sell our own digital products with minimal hassle. And many WordPress users rely on WooCommerce, which is the largest eCommerce platform on the market and super straightforward to use.
The benefits of starting an online store are clear: flexible hours, low startup costs, and complete control over your business.
While getting started is simple, you’ll need guidance on the basics – from choosing the right platform to setting up payments. In this beginner-friendly guide, we’ll walk you through how to start an online store, step by step.
In this guide, we’ll walk you through each step, from choosing the right platform to building your online business to optimizing it for success.
But if you’d rather skip the DIY route, you can contact our team at WPBeginner Pro Services and let our experts create a custom online store for you, all from scratch.
💡 Editor’s Note: In this article, we recommend WordPress.org + WooCommerce because they give you complete control over your online store. If you want to skip this section and jump straight to building your store, go ahead and start reading the tutorial. 😀
Starting an online store is exciting, but we know the first big question can feel overwhelming: which eCommerce platform should you use? We’ve helped thousands of store owners make this decision, so let’s make it simple for you.
Essentially, you have two main choices for building your online store. You can either go with WordPress.org and add an eCommerce plugin like WooCommerce or use a hosted platform like Shopify or BigCommerce.
Think of it like owning versus renting a physical store. With WordPress.org and WooCommerce, you will own your store completely. You choose your hosting, control all your costs, and can customize everything exactly how you want.
Using eCommerce solutions like Shopify is more like renting a store in a mall. While it’s easier to get started, you’ll have less control, and the platform often requires you to upgrade to a higher plan as your business grows. Not to mention, you’re limited to the features they offer.
You can read our comparison piece on Shopify vs. WooCommerce for more details. And here’s a quick comparison table of the different options for online stores:
WordPress.org + eCommerce Plugin
Hosted Solutions (Shopify, BigCommerce)
👍 Pros
• Complete customization control • Lower long-term costs • Own all your data and content
• Easier to set up • Built-in technical support • Regular automatic updates
👎 Cons
• Initial setup takes longer • Responsible for updates • Need to handle security
• Higher monthly costs • Limited customization options • Locked into the platform’s features
Best For
• Growing businesses wanting full control • Budget-conscious store owners • Unique or complex store needs
Overall, our advice is to go with WordPress.org for eCommerce. We’ve had plenty of experience using this platform, and we’ve never felt locked in or limited by what we can create. Plus, you won’t face surprising cost increases as your store grows.
WordPress also lets you choose the perfect eCommerce plugin for your specific needs.
Want to sell physical products? WooCommerce has you covered. Looking to sell digital downloads? Easy Digital Downloads works perfectly. Or need to create a membership site? Check out MemberPress.
In this complete guide on how to start an online store, we will use WordPress.org with WooCommerce, as it’s the most popular eCommerce plugin. Here are the simple steps we will cover, and you can use the links below to skip to your preferred topic:
💡 Want to create an online store without all the hassle? Let WPBeginner Pro Services help! Our expert team can create a custom WooCommerce site easily and affordably. From design to SEO, we’ve got you covered. Get Our WordPress Website Design Services Today!
Step 1: Choose a Product to Sell
The first and perhaps most important step in launching your WordPress online store is deciding what to sell. Your product choice shapes everything about your business, from your brand identity and website features to your marketing strategy and operational needs.
To find the right online business idea, you can start by asking yourself these questions:
What interests you deeply? Choose a product category you’re passionate about. Running an online store takes time and effort, so selling something you care about will help you stay motivated and knowledgeable about your products.
Is there a gap in your local market? Sometimes, the best eCommerce business ideas come from bringing existing products to markets where they’re not yet available. Look around your area or region for unmet needs.
Do you see a problem you can solve? Maybe you’ve noticed a common frustration that needs a solution. Market research can help confirm if other people share this pain point and would pay for a solution.
Can you improve on existing products? If similar products exist, think about your unique angle. Maybe you can offer better quality, lower prices, or target a specific audience that’s being overlooked.
After identifying potential products, you’ll need to decide how you’ll produce, source, and manage them. The table below shows some of your main options:
Experts and creators who want passive income potential
🏭 Manufacturing
Partner with factories to make your product ideas
• Product designs • Larger starting budget • Patience for development
Businesses ready to create unique products at scale
Additionally, you should consider how to price your eCommerce products properly. This decision affects everything from your profit margins to your target market.
Once you know what product you want to sell, you can move on to the next step.
Step 2: Design Your Brand
At this stage, you know what product to sell and have an idea of your target customers. Now, it’s time to create a brand that catches their attention and builds trust. Your brand design will affect everything from your website to your packaging, so it’s worth getting right.
Let’s start with your business name. You will want something memorable that clearly communicates what you do. It should also be easy to spell, remember, and type into a browser.
Take our name, WPBeginner, for example. It’s simple and straightforward, instantly telling visitors that we help WordPress beginners.
Before settling on a name, check if it’s available as a domain name. Ideally, your business name and domain name should match exactly. This makes it easier for customers to find and remember your store.
Also, research whether your chosen name might have trademark issues. Take time to search trademark databases like WIPO and ensure your name has not been taken by someone else.
Next comes your logo design. Modern AI-powered logo makers have made professional logo design affordable for everyone.
Remember, the best logos are often the simplest. Think of Nike’s swoosh or Apple’s apple. These iconic symbols prove that effective logos don’t need to be complicated to be memorable.
You can head over to our beginner’s guide on how to make a logo for more information.
Your color scheme is another crucial element. The colors you choose will appear everywhere, from your website to your social media profiles and marketing materials.
Different colors evoke different emotions and send different messages to your customers.
For example, blue often represents trust and professionalism. That’s why companies like PayPal and Visa use it as their primary color, as it helps customers feel secure when making transactions.
Finally, you will need to consider your typography (the fonts you’ll use). Good typography makes your content easy to read while reinforcing your brand personality.
For instance, serif fonts like Times New Roman often promote tradition and reliability, while sans-serif fonts like Arial suggest modernity and simplicity.
We recommend choosing one font for headings and other important elements to grab attention and another for the body text to maintain readability. Here’s a good example by Poppi:
Once you’ve finished designing your branding, you can move on to actually registering and setting up your online business.
Step 3: Register Your Business
✋ Important Note: The following information is for general guidance only and is not legal advice. We strongly recommend consulting with local authorities, a legal professional, or an accountant to make sure your business complies with relevant regulations in your area.
You’re almost ready to learn how to start an online store, but first, you need to make your business official.
Some business owners choose to do this after launching their WordPress site. This allows them to test their market and product ideas with minimal investment. Others prefer registering before launch so they can claim business expense deductions from the start and avoid potential legal issues.
While the exact process varies by location, here are the key things you’ll typically need:
📝 Business license – This is your official permission to operate. Most areas require at least a basic business license. Depending on what you sell, you might need additional permits.
💰 Tax registration – You’ll need a tax ID number to collect and pay sales tax.
⚖️ Business structure – Decide whether you’ll operate as a sole proprietorship, limited liability company (LLC), or corporation. Each has different legal and tax implications.
🏦 Bank account – Keep your personal and business finances separate by opening a dedicated business bank account. This makes accounting easier and looks more professional to customers.
🛡️ Business insurance – Even small businesses can face unexpected challenges. This insurance can protect your online store from various risks and potential losses.
💳 Business credit card – A separate credit card for business expenses helps track spending and build business credit.
Now that you have everything legally set up, you can move on to our detailed step-by-step guide on how to create an online store with WordPress.
Step 4: Set Up WordPress Hosting & Domain Name
Before you can start building your online store with WordPress.org, you need two essential things: a domain name and web hosting.
Think of launching your online store like opening a physical shop – you need both an address where customers can find you and an actual building to put your store in.
A domain name is what customers type into their web browser to visit your store. For instance, when someone wants to find our website, they type in wpbeginner.com.
Domain names usually cost about $15 per year, and you can choose different endings like .com, .shop, or .store.
Web hosting, on the other hand, is like renting space for your store’s contents. It’s where all your product photos, descriptions, and everything else live. Just like physical stores need different sizes of buildings, websites need different types of hosting based on their size and needs.
Looking at all the hosting options out there can make your head spin. There’s shared hosting, managed WordPress hosting, VPS, and many more.
We’ve tested dozens of hosting companies over the years, and for new WordPress online stores, we consistently recommend Bluehost. Here’s why:
They give you a free domain name for your first year (saves you that $14.99!).
They’ve been WordPress.org’s recommended hosting since 2005.
They’re affordable with prices that work for new business owners.
Their Online Store plan comes with WordPress + WooCommerce pre-installed, so some of your website setup is already taken care of.
Our founder, Syed Balkhi, is also a huge fan of Bluehost:
I’ve been recommending Bluehost since 2012, and their commitment to quality has only improved over the years.
I host several personal and business websites on Bluehost. Their ease of use and reliability make them a go-to choice for me.
Whether you’re just starting or looking to grow your online presence, Bluehost offers a solid hosting platform to build on.
To learn more about this web hosting provider, you can read our complete Bluehost review.
Great news! We’ve arranged a special Bluehost deal for WPBeginner readers. You’ll get your domain name free, plus a big discount on hosting. Just click below to get started or check out our Bluehost coupon code.
Note: If you use our Bluehost link, we do earn a commission – but here’s the thing: you don’t pay anything extra. In fact, you’ll pay less thanks to our special discount arrangement. While we could partner with any hosting company, we only recommend services we actually use and trust ourselves.
Let’s go ahead and purchase your domain and hosting. After clicking on our Bluehost link, you need to click on the green ‘Get Started Now’ button.
You’ll see different hosting plans on the next page.
Since you’re building an online store, we recommend the Online Store plan. It comes with everything you need to start selling, including WooCommerce already installed. Just click ‘Select’ to choose this plan.
Now comes the fun part – choosing your domain name. You’ll see two options: creating a new domain or using one you already own.
For a new domain, simply type your desired name in the box. Already have a domain? There’s a separate section where you can enter it.
We strongly recommend going with a .com domain if it’s available. Most people automatically type .com when entering web addresses. However, if .com is taken, you can check out our guide to alternative domain extensions for other professional options.
Once you’ve chosen a domain name, just click ‘Next’ to continue.
Lastly, you will need to add your account information and finalize the package info to complete the process. On this screen, you will see optional extras that you can purchase.
It’s entirely up to you whether or not you purchase these, but we generally don’t recommend it. You can always add them later on if you decide that you need them.
Once you have completed your purchase, you can go to your email inbox, where you’ll find your Bluehost login details. This will let you log in to your web hosting dashboard to manage your website.
Step 5: Install WordPress
Here’s the best part about using our Bluehost link: WordPress and WooCommerce come pre-installed with your hosting. Bluehost created this automatic setup specifically for people who don’t want to deal with technical details.
Getting to your new WordPress site is straightforward. Just sign in to your Bluehost account, find the ‘Websites’ section in the left menu, and click ‘Edit Site.’ That’s it – you’re in!
You can also type your domain name followed by /wp-admin/ in your web browser (like mystore.com/wp-admin/), and it’ll take you straight to your WordPress dashboard. This is your WordPress login URL.
With WordPress ready to go, we can move on to the exciting part: setting up WooCommerce.
Step 6: Set Up Your WooCommerce Store
If you have WooCommerce pre-installed, you will most likely see the WooCommerce setup wizard immediately after logging in to your WordPress dashboard.
But if not, don’t worry. You can read our WooCommerce made simple tutorial, which will walk you through the installation process.
Once you have installed the WooCommerce eCommerce plugin in WordPress, you can start the setup wizard by clicking ‘Set up my store.’
You can technically skip this step, but we don’t recommend doing that, as this setup wizard will automatically create your WooCommerce store pages for you. This way, you don’t have to make them from scratch.
On the next page, WooCommerce will ask a question about you as an online business owner.
If you’re just starting out, then you can pick the ‘I’m just starting my business’ option.
Next, you need to provide WooCommerce with some information about your business. This includes your business name, type of products, store location, and business email address.
Once you have entered all these details, click ‘Continue.’
On the next page, WooCommerce will show you some free WooCommerce extensions that you can choose to install.
You can click on the ones you plan to use and click ‘Continue.’ Alternatively, you can click on the ‘Skip this step’ button.
Now, you will have to wait a few minutes for the plugin to be installed.
After the setup is complete, you will be directed to the WooCommerce plugin page, where you’ll see a checklist of things to do to build your online store.
Step 7: Select and Customize Your Online Store’s Design
Think of a theme as your store’s entire design package. It controls everything from how your products look to your customers’ journey throughout your WordPress online store.
While WordPress offers thousands of themes, not all of them work well for online stores. You need a theme specifically built for WooCommerce to ensure your products look great and your checkout process works smoothly.
That’s why we’ve created a handpicked list of the best WooCommerce themes to help you choose.
Installing a WordPress theme for your online store is easy. Simply go to Appearance » Themes in your WordPress dashboard and click ‘Add New Theme’. From there, you can browse and install any theme you like.
When it comes to customizing your theme, WordPress gives you two options: the classic theme customizer or the newer full-site editor for block themes.
Both work fine, but honestly? We prefer using SeedProd’s theme builder instead.
Why SeedProd? It’s like having a professional designer at your fingertips. You get a simple drag-and-drop page builder anyone can use, over 350 ready-made website designs to start with, and an AI website builder that can create your entire store design in seconds.
Plus, some of our partner brands have used SeedProd to create their entire websites, and loved the results. For more information, check out our detailed SeedProd review.
With eCommerce website builders like this, you can customize your online store to look and function exactly how you want. It’s also search engine optimization (SEO) friendly, so you can optimize your store for search engines, making it easier for potential customers to find your products.
Stacey Corrin, Lead Writer for SeedProd
SeedProd even comes with an AI website builder that builds a custom theme for you in less than 60 seconds.
Want to see how fast it works? Just check out the video below:
Whichever method you choose, make sure it matches your comfort level. The best website design tool is one that is easiest for you to use. Otherwise, you’ll feel frustrated fast by how complicated the tool is.
Also, don’t feel pressured to perfect your design right away. Theme customization is an ongoing process – you can always make changes as your store grows.
Let’s start adding products to your store. The process is simple: go to Products » Add New from your WordPress menu. Then, you can add your product title and description.
Don’t have products ready yet? No problem! You can add sample data to see how your store will look with products. Our guide on how to add WooCommerce sample data shows you how.
If you have been listing your product information on a CSV spreadsheet, then you can also save time by importing them all at once. Our tutorial on importing and exporting WooCommerce products shows you how to avoid adding products manually.
Once you’ve added your products, here’s how to make them more appealing to customers:
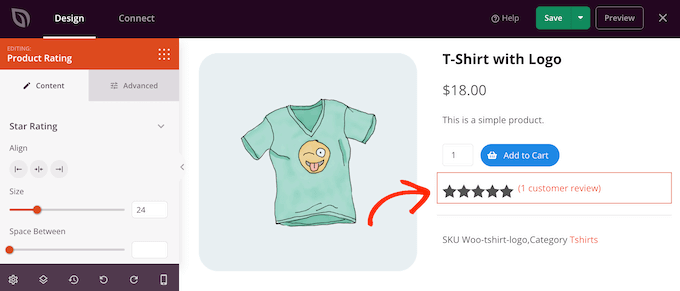
Other than that, you will also need to optimize your WooCommerce product pages. Your product pages are like your digital showroom – they need to look professional and convert WooCommerce visitors into customers.
How you customize these pages will largely depend on your theme choice. Some themes include special features for product displays, while others only offer basic layouts.
This is where SeedProd really shines. It gives you powerful tools to enhance your product pages. For example, you can add customer reviews with star ratings to build trust and persuade potential buyers.
Other than that, you can display related products for upselling, recently viewed products to help users compare items, social buttons for users to share the products, and more.
Now let’s get your online store ready to accept orders. First, let’s focus on setting up payments.
Head to WooCommerce » Settings and click the ‘Payments’ tab. You’ll start with basic options like Cash on Delivery, Checks, and Bank Transfers. WooCommerce also offers its own payment gateway called WooPayments.
While WooPayments seems convenient, it’s not always the best choice. It’s not available in all countries, and some users report issues with payment holds.
We recommend exploring other options, like Stripe with FunnelKit’s free gateway plugin. It offers helpful features like one-click payments through Apple Pay and Google Pay, plus an easy setup wizard.
You may also want to check out other WooCommerce payment options below:
Next, let’s tackle taxes. You can go to WooCommerce » Settings and click the ‘Tax’ tab.
In ‘Tax options’, you can choose whether to include tax in your prices, display tax in your shop and cart, what to base tax calculations on, and whether to add special tax classes.
Then, under ‘Standard rates’, you can set up your tax rules. Go ahead and enter details like countries and regions you sell to, tax rates for each area, and names for different taxes (like GST or VAT)
Need to add lots of tax rates? Save time by importing them via CSV file.
Don’t forget to click ‘Save changes’ once you’re done.
Finally, let’s set up shipping. You can find this under the ‘Shipping’ tab in WooCommerce settings.
You can use ‘Shipping zones’ to define where you’ll ship to and set different shipping methods for each area, like free shipping or flat rates.
In ‘Shipping settings’, you can configure important options like whether to show the shipping calculator on the cart page, set the default shipping address (either shipping or billing address), and enable shipping debug mode if you need to troubleshoot issues
Remember not to hide shipping costs until checkout – this often leads to abandoned carts. Being transparent about shipping costs early in the shopping process helps build trust with your customers.
Under ‘Classes’, you can create special shipping rates for different products.
For example, feel free to set higher rates for heavier items or fragile products that need special handling.
To make it easier for customers to track their orders, consider adding a shipment tracking feature to your online store.
Offering local pickup? You can enable this option in the ‘Local pickup’ tab.
While it’s free by default, you can add some pricing based on your business needs.
Your online store is now ready to accept orders. But first, we need to fine-tune it to set up your business for success.
Step 10: Optimize Your Online Store
Before you launch your online store, we recommend setting up some key optimizations. While these aren’t mandatory, they can significantly boost your store’s success and help you provide a better shopping experience for your customers.
Beyond these essentials, here are other important optimizations to consider:
📞 Contact forms – Every professional store needs a way for customers to get in touch. We recommend WPForms for creating professional contact forms that build trust with customers.
🔍 Product search – Make it easier for potential buyers to look for their desired products. Use SearchWP to improve your WooCommerce search engine.
⭐ Social proof – Show potential customers that others trust your store. Use TrustPulse to display live sale notifications and Smash Balloon Reviews Feed to showcase reviews from platforms like Google and Trustpilot.
📱 Customer updates – Keep your customers coming back by staying in touch. We recommend PushEngage for browser notifications and Constant Contact for email marketing.
💾 Backups – Protect your store’s data and content from unexpected issues. We recommend Duplicator for creating reliable backups of your entire store.
🔒 Security – Keep your store and customer data safe from threats. We recommend Cloudflare for additional security features and better performance.
You may also want to check out our expert picks of the best WooCommerce extensions to improve your online store.
WordPress is incredibly powerful and flexible, but we understand it can sometimes feel overwhelming, especially for beginners. That’s why we’ve created a lot of free resources to help you succeed.
At WPBeginner, we make WordPress easy to understand, even if you’re not tech-savvy. Here are all the ways you can learn from us:
Many of our users also type their questions in Google and just add ‘wpbeginner’ at the end of it. This shows them related articles from WPBeginner. For example: ‘how to add product search in woocommerce wpbeginner.’
Step 12: Take It Further
At this point, you’ve learned the basics of how to create an online store with WordPress. But did you know your online store can be customized to sell practically anything?
Here are some exciting product possibilities we’ve helped our users sell:
The best part? WooCommerce makes selling any of these possible with the right plugins and setup – no coding needed.
Want to explore other options? Check out our detailed WordPress eCommerce setup guide for different product types.
FAQs About Starting an Online Store
Many of our users regularly reach out to us with questions about starting their own business with an online store. We have tried to answer some of the most frequently asked questions below:Where do I find products to sell in my store?
Can I start an online store for free?
How much does it cost to start an online store?
Can I create an online store without shipping products?
Video Tutorial
If you don’t want to follow our written instructions, then you can check out our video tutorial on how to start an online store:
Editorial Staff at WPBeginner is a team of WordPress experts led by Syed Balkhi with over 16 years of experience in WordPress, Web Hosting, eCommerce, SEO, and Marketing. Started in 2009, WPBeginner is now the largest free WordPress resource site in the industry and is often referred to as the Wikipedia for WordPress.
The Ultimate WordPress Toolkit
Get FREE access to our toolkit – a collection of WordPress related products and resources that every professional should have!
prabLove your whole website, so helpful. so we can set up a woo ecommerce shop on our blog ,like a seperate section?Reply
WPBeginner SupportIf you want to you can certainly have the store only be a part of your siteReplyAdmin
mohadese esmaeeliI am still in the process of configuring and setting up my store. I appreciate this excellent article. The solutions mentioned were truly helpful for me. I learned a few new tips that I was not aware of before. The tutorial on payment settings was particularly practical.Reply
WPBeginner SupportGlad our guide was helpfulReplyAdmin
Peter IriogbeI used to be nervous about starting an online store, but this article gave me the confidence with its clear steps. Thanks a bunch for the guidance!Reply
THANKGOD JONATHANWhile cash on delivery and bank transfer are some of the most convenient payment methods. However, I some countries PayPal is not fully available for making all business transactions. So, does woocommerce also provide other card payment methods?Reply
WPBeginner SupportWooCommerce does have other payment methods available.ReplyAdmin
Dennis Muthomiquick question….Since cryptocurrencies are popular, especially in certain regions, it would be really helpful if WooCommerce could natively accept payments in crypto like Bitcoin, Ethereum, etc. While there may not be an official integration yet, are there any recommended third-party plugins that can enable crypto payments seamlessly on a WooCommerce store?Reply
FajriGood article, I followed the steps above to create my online store using WooCommerce, but, I’ve found in my country Stripe is not supported, so, I will set up my store with PayPal, I am still confused about setting itReply
Unarine Leo NetshifhefheThanks for this article, does stripe cover for African countries? Does it intergrate with local banks which are around Africa? I want to have an option of Paypal and also a third party payment gateway that will work for me, I once tried payfast but i struggled with the setupReply
WPBeginner SupportYou would want to reach out to Stripe for their current coverage and integration for this.ReplyAdmin
Lara CarterCan I just say thank you so much to the creator of this website because I have looked at a number of articles on this website and they are all so well explained and fluently written. My young enterprise book has been looking into creating a store for our product and none of us had any idea how to go about it. I was recommended this website at a careers fair and have been reading the articles and have found that they are so well written and easy to understand. Usually, I am completely lost when it comes to understanding things like this but this webpage was so helpful and I just wanted to say thank you so much for whoever created this resource and it helpful so useful and amazing.Reply
WPBeginner SupportGlad to hear you’ve found our guides helpfulReplyAdmin
Enricka JulienI found this blog post on starting an online store in 2023, incredibly insightful and informative. The author’s step-by-step guide and up-to-date tips provide a solid foundation for anyone looking to venture into e-commerce. The video tutorial, along with practical advice, makes it a valuable resource for both beginners and experienced online store owners. I appreciate the effort put into creating this helpful resource, and I’ll definitely be referring back to it as I explore the world of online entrepreneurship. Thanks, WPBeginner!Reply
WPBeginner SupportYou’re welcome, glad you found our article helpfulReplyAdmin
TessaLoved this thorough info, thank you! The video touched on the fact that there is the account login button next to the shopping cart, but I’m not sure the best way to get that set up – do you have a tutorial on setting up customer account login?Reply
ROB S.Is it possible to build, populate, test. etc an ecommerce site offline and only buy the domain and pay for hosting once you have everything just as you want it. if so, how? As of right now i have maybe 20 minutes to an hour free a few times a week i’d like to spend making an ecommerce site but i also need to to make my product and take photo’s that will eventually be on my site. i’d rather not pay for hosting for months and months as i’m getting everything else done while the site remains invisible or unpublished.Reply
JavHi,I was just wondering on where will I be able to enable the brands section in the product list. I can’t seem to find it, do you have any suggestions on how to?Reply
WPBeginner SupportMost would use a category or a custom taxonomy for what you are wanting.ReplyAdmin
Isabelle RogerHello,Thank you for this article. It is very helpful. One thing I’m trying to do is make a checklist of all the pages and elements and features that a great ecommerce site should have (customer service page, package tracking, etc). You know, everything that makes an e-commerce site look very professional. Do you know if there is a comprehensive guide or checklist?Reply
WPBeginner SupportWe do not have a specific checklist for that at the moment as each site has its own needs and wants.ReplyAdmin
AhmedThank you for the useful information, I have a question, can I cancel the payment in the sense that the payment is through another famous site such as Amazon, but I only want to add to the basket, I hope you understand meReply
FrancisGreat instructions above!!!! My client is from the Philippines, they don’t want to add a payment option/gateway but instead an order details (list of products ordered with price, quantity, color etc) will be sent to my client’s email to get the summary of a buyers order. Thank youReply
AbdouThank you, but I have a question first. When providing basic information about my store, my address, region and country. Do you mean my address and my real country or a target audience?Reply
WPBeginner SupportYour store information would be for your store’s information and not your target audience.ReplyAdmin
Jacy P.Thanks for walking me through the process of setting up an online store. You made it so easy for me.God bless you.Reply
BrendaHi there, Thanks for a really informative site that I turn to to solve my WP issues. I have one now about this topic. I’ve read through the other questions that I can add a store to an existing WP site. Can I add the store link as a new menu item? I’m not a Macy’s as I’m just starting out?Reply
WPBeginner SupportYes, you can and probably should use a menu item to link to the store on your siteReplyAdmin
AnuHi ,Can i have the word press for blogging and store separately and give different names to both .as the purpose i want to use both is differentReply
WPBeginner SupportIf you mean a different domain, while it is possible, it would normally be simpler to have two different sites for that.ReplyAdmin
SusanaHi, I have set up my domain name, web hosting and SSl certificate with Bluehost but when I login into WP it I can’t find the woocommerce to set up my WP websiteReply
WPBeginner SupportYou may need to add the plugin under Plugins>Add New if it is not included.ReplyAdmin
Mide OluThanks for the good job. It’s been very helpful. Can a site hold more than one store?Reply
Tamara Ilicwish i found this before i tried to set it up on my own!!! Great tips, thanks for sharing.Reply
WPBeginner SupportGlad you found our guide helpfulReplyAdmin
WillHello,Is this promotion still active? When I follow the link you provided, it just goes to bluehost. There is no option for 3.95.Reply
WPBeginner SupportBlueHost may have updated their pricing since the last update to this article.ReplyAdmin
AllenHi, I am at that step where I’m supposed t change HTTP to HTTPS, but it shows a temporary address for my WordPress address.what do i do ? should i change this to HTTPS ?Reply
WPBeginner SupportYou would want to change your domain to the correct domain before activating HTTPS, if you reach out to your host they can help with updating your domainReplyAdmin
Stuart Mc DonaldI want to start an online store , I have a wordpress site. I do not want to bring the products to my place and send them to the customer, your article does not have suppliers. Once I find a supplier could I send it to the customer from the supplier ?Reply
George E MurphyMy dilemma is that we already have a domain. Do we need to create a separate domain (website address) to do this? We have some items that we want to offer those who browse our website. The store would not be the whole website. Only a part (page) of the site. I presume I can still use the blueprint you offered. Look forward to your response.Reply
WPBeginner SupportYes, you can use this as part of a site instead of the entire site if you are wanting.ReplyAdmin
ABBEY MICHAELI wanna say a big thank to you. Your tutorial are awesome. Even a beginner can never get lost trying to follow the steps.Reply
WPBeginner SupportGlad you found our guide helpfulReplyAdmin
Jhon PaceGreat article. As I am beginner it will helps me to start an online store. Thanks for this valuable article.Reply
WPBeginner SupportGlad you found our guide helpfulReplyAdmin
YoshikoI am helping set up my friend who wants to sell products on this site. It does not seem like when he purchased a web hosting account, he did not get the hosting and Woocommerse bandle, but can I add Woocommerse plug in now and follow your direction from there?Reply
WPBeginner SupportIt would depend on the specific hosting but normally you should be able to add WooCommerce to different hosting even if it is not specifically a WooCommerce plan after which you can follow our guide.ReplyAdmin
Olanrewaju K OlaakandeCan WooCommerce be used for an ‘affiliate marketing” site?Reply
WPBeginner SupportYes, it would depend on how you’re wanting to use it for how to set that up.ReplyAdmin
Willem Rudolf NelOn WordPress I am only allowed a free website but it will have the wordpress extension in it unless I purchase a plan through wordpress as well?Reply
JulienHi, I’ve followed the steps until setting up HTTPS to use SSL. I’ve changed it from http to https, now I can’t open the my wordpress. it loads as 404 NOT FOUND. I can’t access WordPress for my site anymore. How do I fix this?Reply
WPBeginner SupportMore than likely there may be an issue with your SSL certificate. If you reach out to your hosting provider they should be able to assist.ReplyAdmin
DanThis is very informative along with the other tutorials I was reading from your page. It’s simplified, easy to comprehend and I wasn’t confused with technical jargon that would’ve have stirred me away to keep searching. Much appreciation for your time and effort to provide such resources so that others may learn and hopefully prosper from.Reply
WPBeginner SupportGlad you found our guide helpfulReplyAdmin
SyndeeHi! Your article and videos have been so helpful! I purchased a hosting package through Bluehost that preinstalled WordPress and WooCommerce. I notice in this article you install WooCommerce later after setting the site up. If I follow your instructions will it cause issues since WooCommerce is already installed? One thing that’s confusing is that there are pages already set up for WooCommerce that don’t match the theme that I chose. So things aren’t matching when previewing my shop and website pages.Reply
WPBeginner SupportNo, it will not cause an issue.ReplyAdmin
Oringanje Philip chineduI want to start online businessReply
WPBeginner SupportThis article should help you do thatReplyAdmin
BerniceI like this video don’t forget to subsribeReply
WPBeginner SupportGlad you liked our videoReplyAdmin
NickI cannot see the widgets live in my Sidebar what do I need to do?Reply
JeanCan I use the same information, the same way it’s being described for an online dropshipping business? Because on dropshipping you don’t have the items you sell for a third party and get your commistion. How does that work if I have to use this website?Reply
FlorenceYou guys are doing great job am bless to have you by my side thanksReply
WPBeginner SupportGlad we can be helpful and thank you for your kind wordsReplyAdmin
Adam RayThanks for sharing the great blog. This is very informative for my shop online. thanks.Reply
WPBeginner SupportYou’re welcome, glad our guide could be helpfulReplyAdmin
Lal MuhammadWpbegginer is really good and amazing site to learn a lot for begginers……..we support and appreciate you….Reply
WPBeginner SupportThank you, glad you like our contentReplyAdmin
ChandraGreat article!! Very useful for beginnersReply
WPBeginner SupportThank you, glad you found our article helpfulReplyAdmin
Dawn GrovesFolks, when I posted this article link in linkedin, the caption for the image was “How to start an online store in 2019” You might want to update that.Reply
WPBeginner SupportThank you for letting us knowReplyAdmin
LeahI would like to set up my art gallery with just a Buy it Now button from PayPal. Is this possible or do I have to use WooCommerce?Reply
WPBeginner SupportFor single items you could do that, WooCommerce gives you more tools for showing and tracking purchases on your site.ReplyAdmin
Thanks for choosing to leave a comment. Please keep in mind that all comments are moderated according to our comment policy, and your email address will NOT be published. Please Do NOT use keywords in the name field. Let’s have a personal and meaningful conversation.
Don’t subscribe All new comments Replies to my comments Notify me of followup comments via e-mail. You can also subscribe without commenting.
WPBeginner is a free WordPress resource site for Beginners. WPBeginner was founded in July 2009 by Syed Balkhi. The main goal of this site is to provide high quality WordPress tutorials and other training resources to help people learn WordPress and improve their websites.
The WordPress® trademark is the intellectual property of the WordPress Foundation. Uses of the WordPress®, names in this website are for identification purposes only and do not imply an endorsement by WordPress Foundation. WPBeginner is not endorsed or owned by, or affiliated with, the WordPress Foundation.


 ReplyAdmin